

Introduction#
A Wireless Local Area Network (WLAN) leverages radio frequency transmissions to establish network connectivity amongst co-located devices within a defined geographical area. This eliminates the need for physical cabling, facilitating user mobility while maintaining network access.
Objectives:#
In this activity, I will configure both a wireless home router and a Wireless local controller (WLC)-based network. I will implement both WPA2-PSK and WPA2-Enterprise security. Configure a home router to provide Wi-Fi connectivity to a variety of devices. Configure WPA2-PSK security on a home router. Configure interfaces on a WLC. Configure WLANs on a WLC. Configure WPA2-PSK security on a WLAN and connect hosts to a WLAN. Configure WPA2-Enteprise on a WLAN and connect hosts to the WLAN. Verify connectivity & WLAN connectivity


Part 1: Configure a Home Wireless Router#
To change the DHCP settings I access the Home Wireless Router GUI and change the router IP and DHCP settings according to the information in the Addressing Table.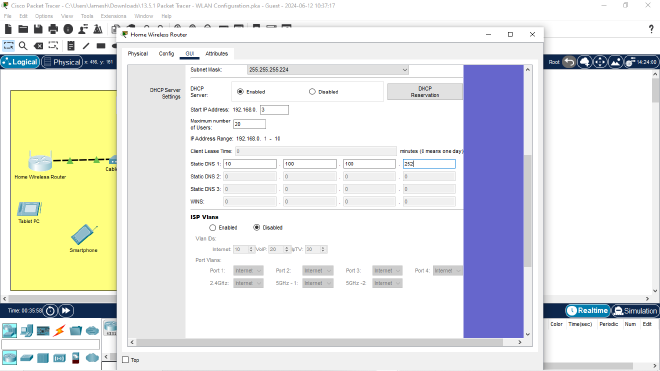
I set the maximum number of users to 20. Start IP address from 3. The static DNS server with the address 10.100.100.252. The internet IP address 10.100.200.2 /27. The subnet /27 is 255.255.255.0
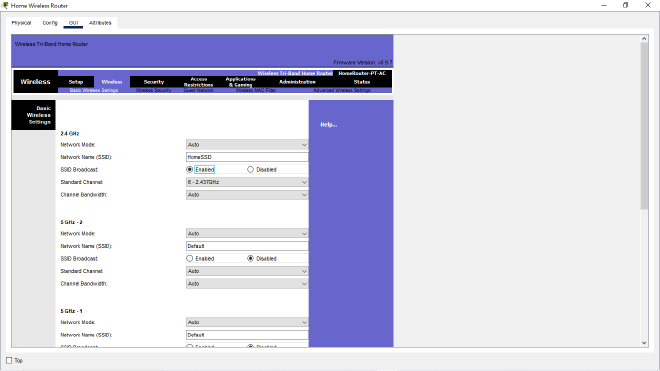
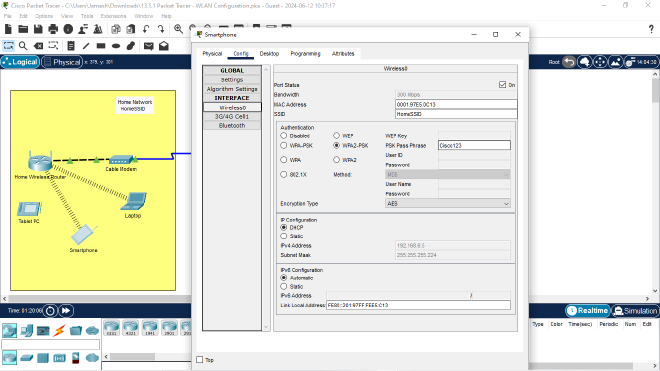
To configure WLAN, I used the 2.4GHz WLAN interface in the Basic Wireless Settings tab. The SSID name is Home SSID. I choose the standard channel 6 – 2.437 GHz. I enabled the SSID broadcast
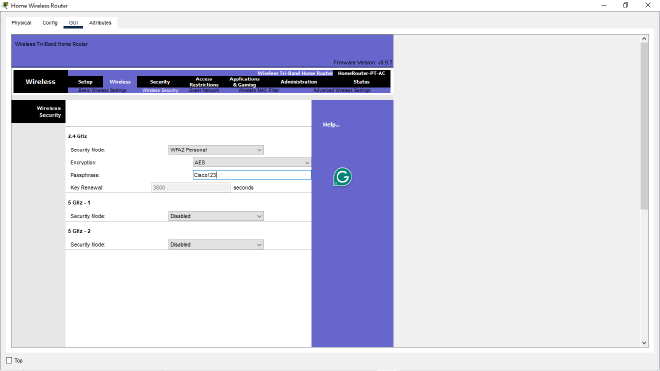
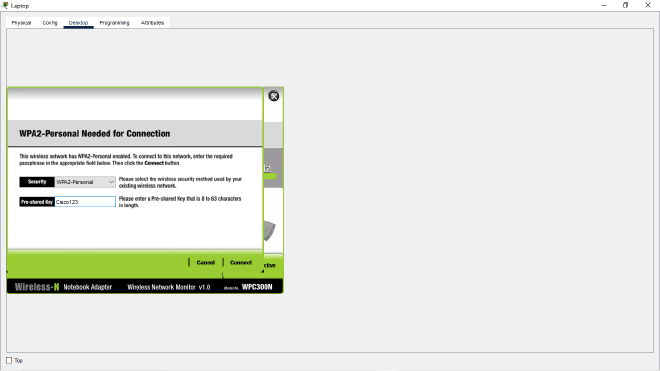
To configure security in the wireless security tab I choose the WPA2 Personal option and the passphrase as Cisco123.
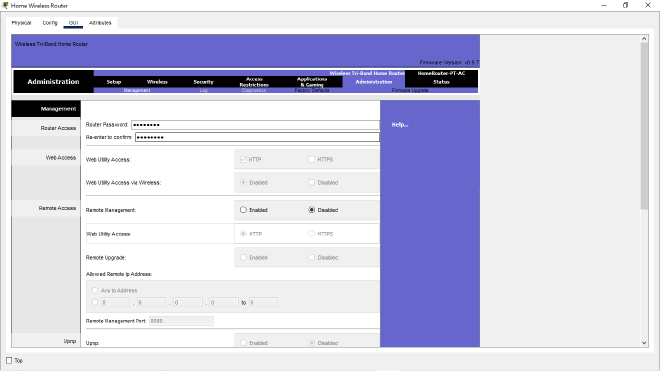
I also changed the default password to Cisco123. Default passwords are common and easy to be compromised thus the need to change it.
Next, I connect clients to the network. I opened the PC Wireless app on the desktop of the laptop. I picked the SSID named Home SSID which I configured earlier with the password Cisco123.
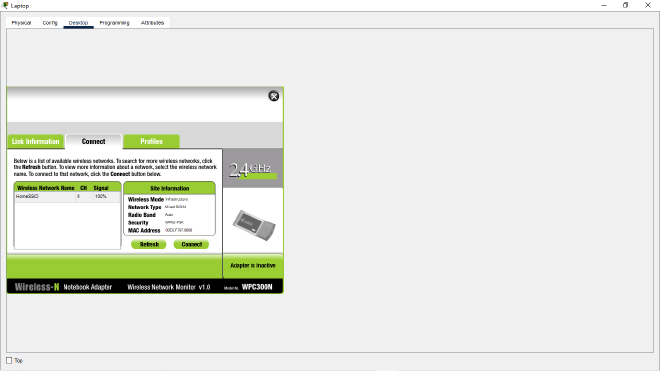
The laptop once connected had some parallel lines connecting it to the router representing the wireless connection was active
For the smartphone I configured it under the config wireless panel to the same SSID and credentials as the tablet and the laptop.

The tablet configuration is shown above.
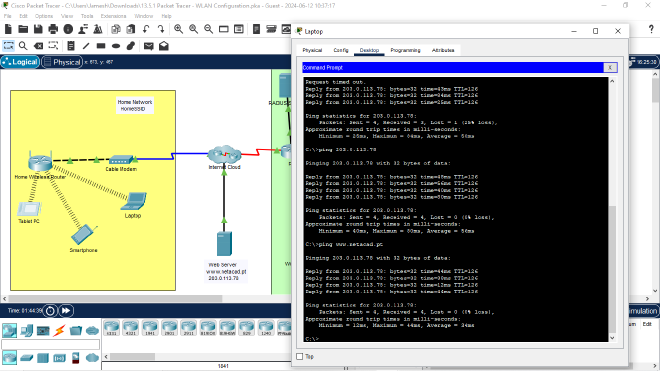
To verify the connection was active I performed ping from the laptop to 192.168.6.5- Smartphone, 192.168.6.5-tablet, to the webserver IP address 203.0.113.78 and www.netacad.pt . The ping were successful.

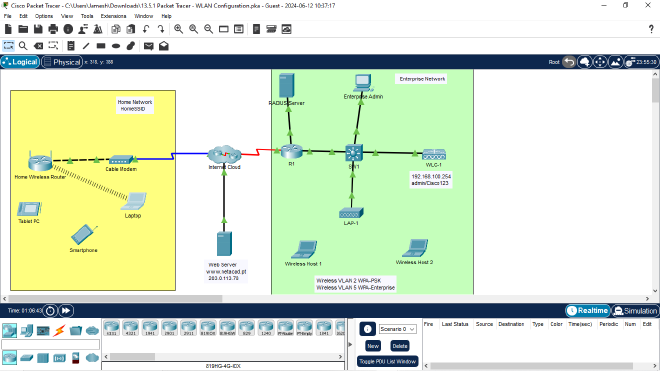
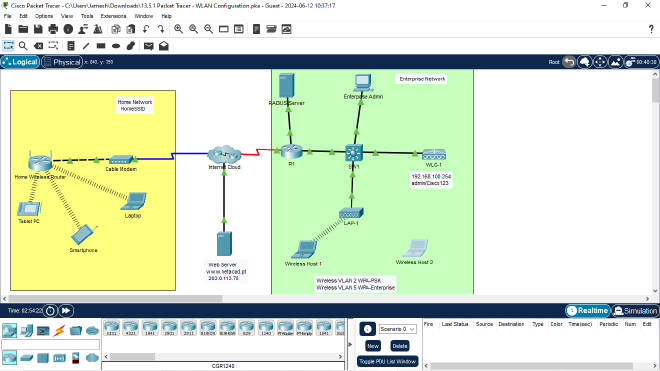
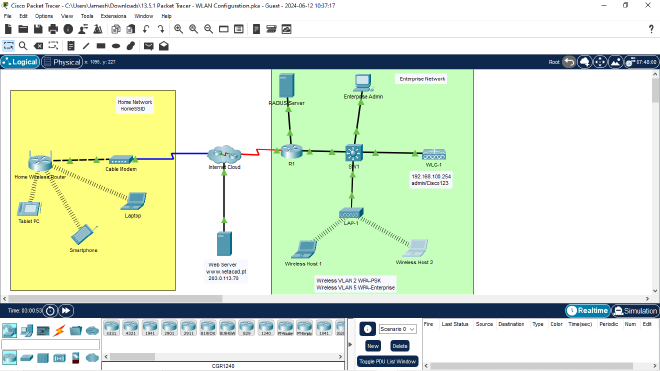
Part 2: Configure a WLC Controller Network#
In this part one WLAN will use WPA2-PSK authentication. The other WLAN will use WPA2-Enterprise authentication. I will also configure the WLC to use an SNMP server and configure a DHCP scope that will be used by the wireless management network.
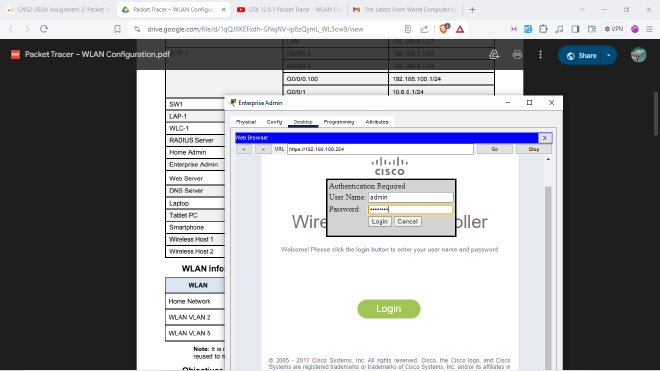
To configure VLAN interfaces I accessed the Enterprise Admin and navigated to WLC-1 management interface via a web browser. To log into WLC-1,I used admin as the username and Cisco123 as the password.
The first WLAN was WLAN 2 controller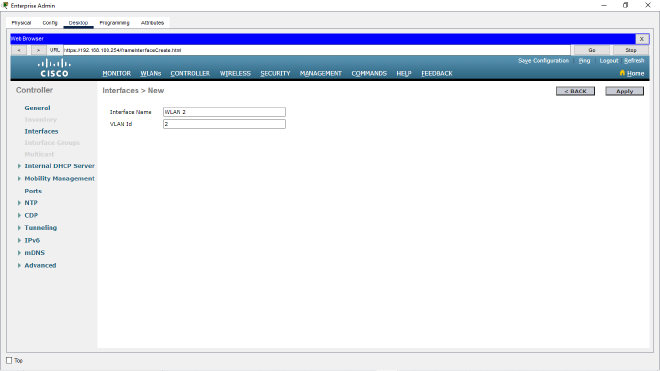
The setting for WLAN 2 can be seen below

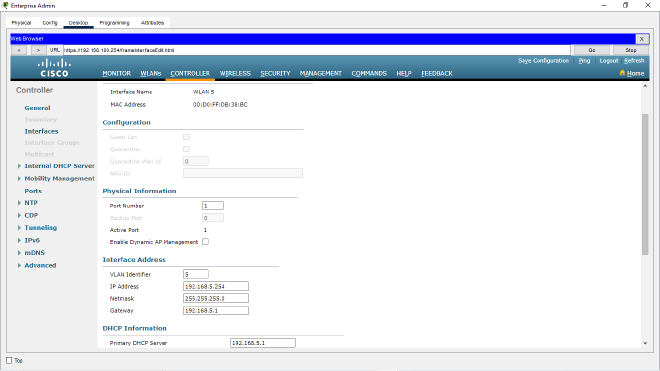
To configure WLAN 5, I followed similar steps as WLAN 2
The next step is to configure a DHCP scope for the wireless management network with the specification offered in the lab.

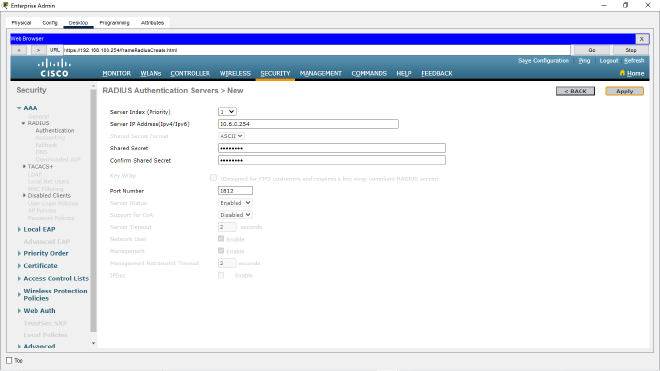
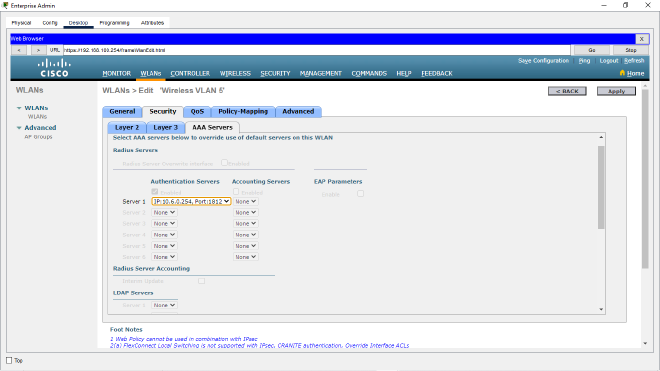
In step 3, I configured the WLC with external server addresses. Under the Security tab I configured a new RADIUS authentication server with index 1.
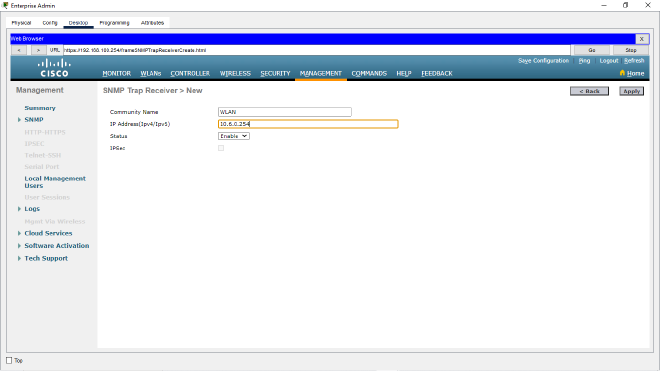
I also configured a WLC to send logs information to an SNMP server. Community Name: WLAN
IP address: 10.6.0.254
In step 4, I created the WLAN’s and enabled them
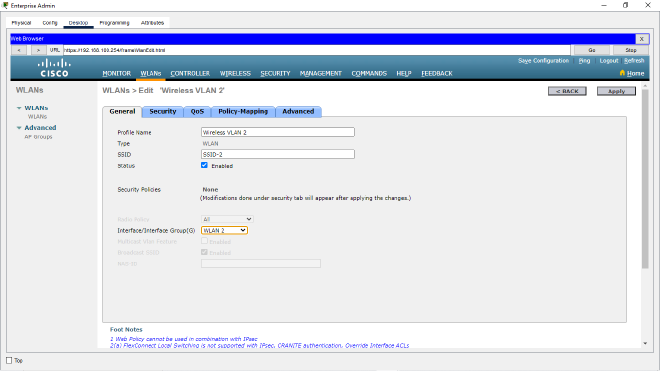
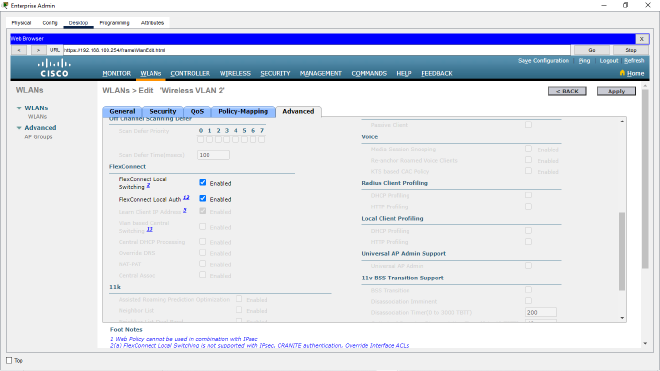
The WPA2-PSK security was used by Wireless VLAN 2. Also had to enable Enable FlexConnect Local Switching and FlexConnect Local Auth.
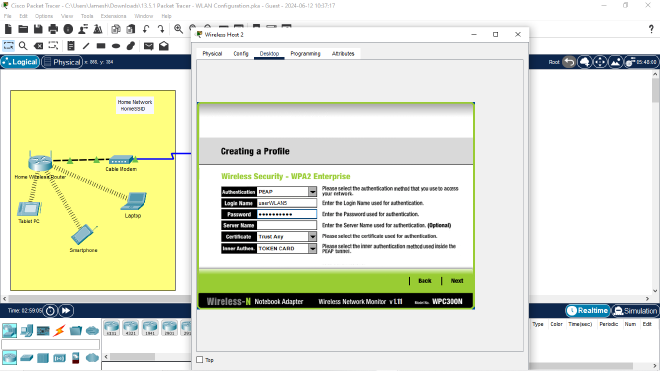
The second profile Wireless VLAN 5 used 802.1x - WPA2-Enterprise security . I configured it accordingly.
In step 5 , Wireless Host 1 should connect to Wireless VLAN 2.Wireless Host 2 should connect to Wireless VLAN 5 using the credentials in the WLAN information table.
From Wireless Host 1 I selected SSID 2 and typed the password as Cisco123. The connection went through.
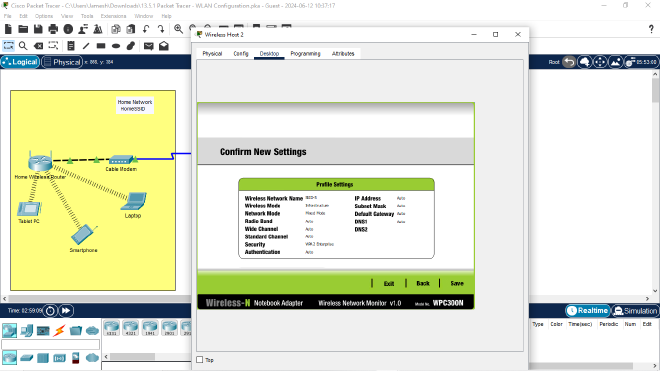
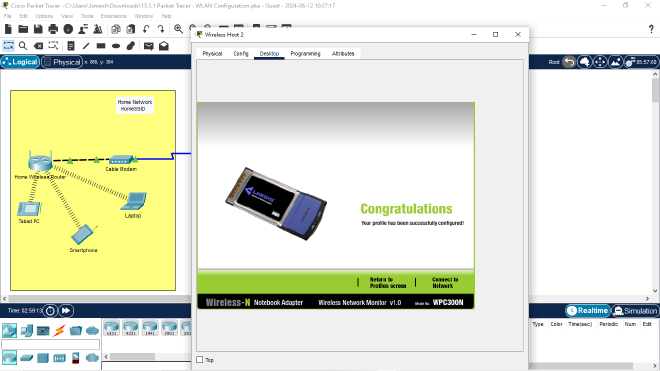
Since Wireless VLAN 5 used 802.1x - WPA2-Enterprise security, the connection had to happen via a profile creation using the details provided in the addressing table.
Both Wireless hosts were now connected to the network.
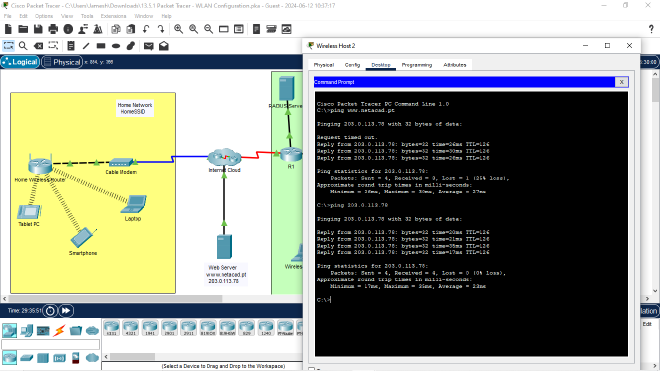
To test the network I ping the IP and URL to the webserver www.netacad.pt .
Wireless host 1:
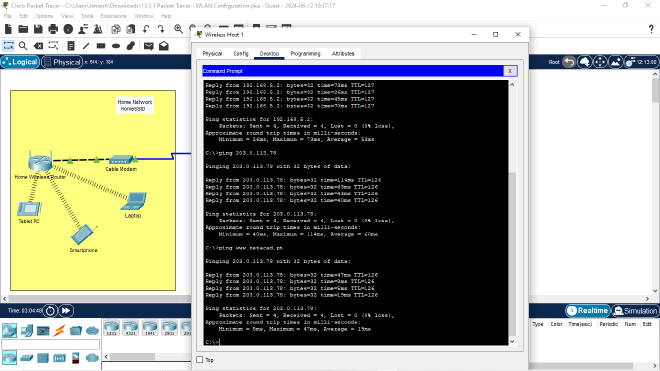
Wireless host 2:
Conclusion#
Through this comprehensive laboratory experience with Packet Tracer, I gained practical expertise in implementing both residential and enterprise wireless security solutions. The progression from configuring a basic wireless home router to implementing a WLC-based network provided invaluable hands-on experience with both WPA2-PSK and WPA2-Enterprise security protocols. By methodically working through each configuration step - from setting up wireless interfaces and establishing WLANs on the WLC to implementing varying levels of security protocols - I developed a thorough understanding of secure wireless deployment practices. The practical verification of connectivity across different security configurations demonstrated the real-world implications of each implementation choice, reinforcing the importance of proper security protocol selection and configuration in wireless networking.
_